| The Canadian National Air Museum in Ottawa
has an Avro with a Bentley. Gerry Nadon really went out
of his way lending me a stepladder and escorting me
through the archive library. Gerry's a modeler also and
president of Stetson Flyers Model Club in Ontario. They
even unbound Avro maintenance and operating manuals so I
could copy them. What a great bunch of guys--even got to
meet the reconstruction crew in the workshop. It's a
class "A" job they do putting back together
history. My Canadian flying buddy, Lou MacDonald, made
the Ottawa connection. I
usually scratch build, but Arizona Models had a 1/3 Bob
Holman plan and would put together a kit. All of my early
warbirds are built with proven construction design and
techniques by Jon Tanzer. The airfoil is semi-symetrical
modified Clark Y using Wingmaster software. I needed a
thicker airfoil to fit a 1-1/4" wing tube at 2-1/2
deg dihedral. With John's stamp of approval, I had
Arizona laser-cut the ribs. I used only the rear formers
in the kit as I again used John's way of locking the
firewall, cabane, lower wing, and landing gear. Per John,
I used 0 deg wing and 1-1/2 pos stab incidence.This seems
to stop the vintage model from power porpoising. The
engine has 2 deg down and right thrust. The model flew
without any trim and handles well with power surges.
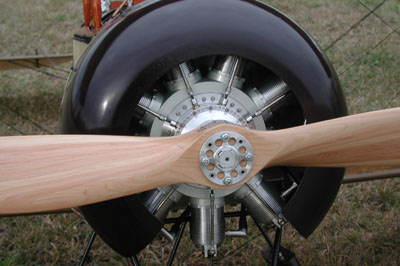
Arizona furnished a 15-1/2" aluminum cowl. I
contacted World War I Aeroplanes, Inc. for the Danish
Gov't Archives Set--that had all the drawings of every
bracket and detailed the wood construction. After
enlarging at Quick Copy to scale, I redrew on my CAD the
details needed. Arizona then had them water-jet cut in
stainless steel. They are black chromed not painted. I
even die folded the sheet development for the control
horns and pulley guards to scale. Making the scale gas
tank was a challenge as I had to learn how to spin the
end cones in brass. The prop is scale 35/32 from
Tennessee Propellers--custom made. They do ultralite
props. 10" wheels are from Reid's Model Products.
Spruce Aircraft Specialties supplied me with some
beautiful 6-ft long 1/4 x 1/2" spruce for the spars
and 1/8 x 1/4" stringers. The leading edge is a
sheeted "D" section. When fitting the wings, I
noticed they were strong enough to fly even without
wires.
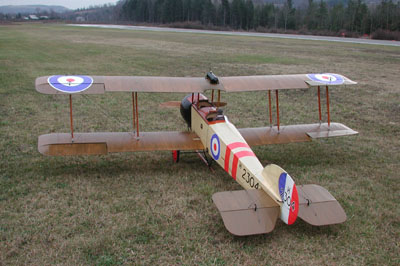
The 12-ft wingspan is assembled
with 4 each thumbnuts on the 1/4 x 13 L threaded rods.
This makes the wings pull on each other rather than glued
wood. All wires are prestrung with 6 passes of 30 lb
Kevlar using 23 homemade turnbuckles with 6-40 thread and
20 with 4-40 thread. These, as per original, have
phosphor bronze centers and heat-treated chrome molly
eyes and forks with nickel plating. All forks have a 17-4
PH stainless clevis pin, No.2 washer and 1/32 cotter pin.
This is how the real ones are rigged. At the field, all
that has to be done is to nut the wings, attach the two
front fly wires that go to the cowl, hook up the ailerons
and fly.
The plane balanced perfectly--guess
that 13.5 lb engine helped! Total weight is 52 lb and at
5500 sq.in., it is 22 oz/ft sq. The pilot is 1/3 vintage
by Diane Chevalier--note the scarf flowing in the wind in
the video.
VIDEO
The first flights on 12/4/01 were
only bits and pieces since everybody wanted to watch
rather than look through a camera. The first two were
dead sticks as I was too lean. The third flight was 5
minutes. My friend Ron Fancett volunteered to film the
fourth flight on 12/12/01. With the upstate New York
winter creeping in, I only had this gloomy, windy (15-20
mph), gusty day. Temperature was 40 degrees with wind
chill and prop wash near 0. I should have had my head
examined as I wouldn't have flown my sport planes in
those winds. The turns were rough owing to the
weathervaning. At half way through I had to reverse
aileron and rudder to stop the whip. In the first flights
we had 5 mph winds and made beautiful flat rudder only
turns. The rough weather flight shows some aileron stall
typical of a bipe without differential and lots of
sideboard. It is going to take some getting used to the
throttle. The landings are like a Cub--if you only have
Cub weather! It appeared the engine needed some cam
timing change but seemed to power up on takeoff okay and
maybe too much for the high speed scale flyby. As I get
used to the throttle, the other two speeds will get some
use. Thanks to my ground crew, Dick Owens and Bob
Pickney. Notice Bob was prepared for the wind chill with
his snowmobile suit-up!
LINKS TO
PHOTOS AND VIDEO
The photos show individual pieces
of the engine after machining but prior to assembly.
Click on the link below to view the photos. Use the link at the bottom of the
photo page to return to my web page.
Photos: Click Here to View Photos
The video link below can be
saved to your computer and viewed after downloading or
viewed without downloading if you have a high-speed
internet connection. To view the video without
downloading, simply double-click on the link. To download
the video, place your mouse cursor over the link and
click the right mouse bottom. This will bring up a menu
with one of the choices being "Save Target As".
Click on "Save Target As", at "Save
In" select the directory on your computer where you
want the video stored, and then click "Save" at
the bottom of the menu. The video will then begin to
download. You then will be able to view the video after
it is saved to your computer. It will take approximately
10 minutes to download if you have a high-speed internet
connection and approximately 60 minutes to download if
you have a dial-up internet connection.
Video:
Click Here to View Video
Slideshow:
If you find it difficult to view or
download the video because of a slower internet
connecton, try the slideshow. Click Here to View
Slideshow. Use
the buttons in the upper right corner of the photo page
to move forward and backward. Use the link at the bottom of the page to
return to my web page when you are through viewing the
slideshow.
Once again I want to thank everyone
who helped me in creating and testing the Gnome 160 and
the Avro 504.

|